The green, coral, and gray sneakers that I quilted.

Make Your Own Quilted Sneakers

I just finished my own pair of quilted sneakers and had so much fun with it, I thought I would put together a tutorial for anyone else interested in making their own pair! Use this form if you would like your own downloadable PDF copy! Note: This page contains affiliate links.

Supplies

  • Sneaker Kit, available at the following shops

USA

Maker’s Leather Supply

Tandy Leather

Chicago School of Shoemaking

EU

https://www.sneakerkit.eu

  • Fabric scraps (about 1 yard total, generous estimate)
  • Batting scraps
  • Pattern you plan to use. I just used a printed fabric I really liked instead of piecing something. If you plan to piece, make sure it's really small so you can actually see the design!
  • Shoelaces, available at the following shops and elsewhere online

The Shoelace Factory

Lace Lab

Looped Laces

Note: My instructions will cover the Classic 3 in 1 pattern.

Important: To make a sneaker out of quilted fabric versus leather, we will need to do some extra steps. These steps will make sure that there are no raw edges. 

The mini quilts will be made up of the quilt top and the batting only. The backing/lining will be sewn at a later step. The photos and instructions will describe this method, but see an alternate construction option below.

Option with bias tape: Create a quilt sandwich as normal and quilt the quilt top, batting, and backing/lining together. Cut the panel pieces from the finished quilt. Sew bias tape to the top edge of the panels and top stitch or serge the raw edges of the bottom of the panels and the V.

For my mini quilt, I used (432) 1.5" squares to make a simple grid pattern. I recommend using something on the smaller scale since the panel pieces are so small.

Use whatever quilting motif inspires you. I'm a straight-line quilting lover, so I'm using a simple crosshatch motif. Remember, the backing fabric should not be attached yet. You are only quilting the quilt top and the batting together. Once you have quilted the quilt top to the batting, proceed to the Panel Construction Steps below!

If you haven't printed your templates yet, they are available here. The sneaker pattern is scaled for A4 sized paper. If you are in Europe, print at 100% scale like normal and measure the 10 cm line. If you are in the US, I recommend printing the first page at 100% scale and measuring the 4 inch mark on the pattern. Do not skip this step! If your paper is too small, increase the scale by 1%. If the paper is too big, decrease the scale by 1%. Adjust until the bar measures exactly 4 inches. You can use the scrap paper to print another template (just mark an X on the incorrect side!)

Panel Construction Steps

    1. Cut out the template pieces on the line for the type of shoe you want. I cut out on the middle line, but there are high- and low- tops available on the same template. Snip the notches. Tape the back of the side pieces together where indicated.
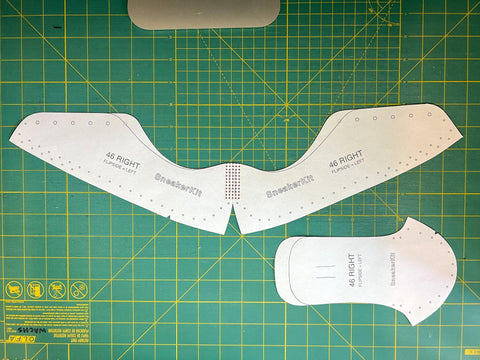
    The Sneaker Templates laid out on a cutting mat.

      2. Next, place a template on the batting side of your quilted panel. Note: Using the right-side template will create a left-hand shoe panel. Trace the template directly on the batting with a marking tool (I used an Ultra Fine Sharpie). Be extra careful to not let the template move around while tracing. I recommend pinning or placing pattern weights on the panel template. There is not much margin for error. Note: in the photo below you will see marked dots. This is not necessary at this step since we will be marking the dots once the panels are complete.
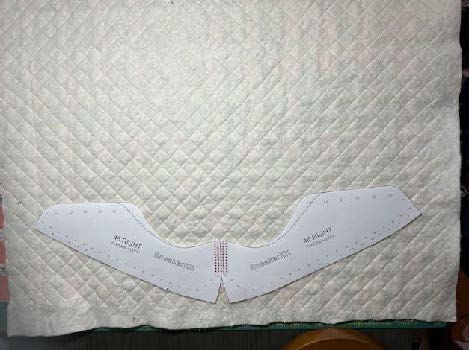
      The sneaker paper template laid out on batting.

      3. Cut out the marked panels with a ½” - 1” margin. Place the panels RST with your lining/backing fabric and cut roughly to size. One FQ of backing fabric was enough for my panels.

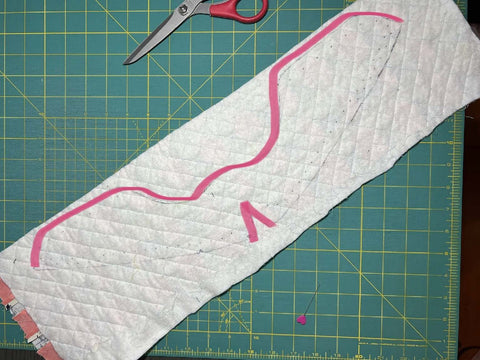
        4. Sew directly on your marked line at the top of the shoe panel (take your time!), and on the V made from taping the templates together, as shown in pink. Leave the remainder unsewn. Watch here

        Highlight showing where to sew the quilted sneaker panels together.

          5. Cut the excess ⅛” away from where you sewed. You will have excess fabric on the bottom. Keep the trimmed quilted material for practicing eyelet installation! Watch here
            6. Flip the assembly inside out and push out the corners with a Hera marker or similar implement. Make sure there is no fabric tucked into a crevice. Press with your iron to flatten. Watch here
              7. Take the assembly back over to your work surface and lay the template back on top. Remember, if you used the right-side template you created a left-hand shoe panel. Make sure that the edges are aligning accurately. If it seems really off it’s probably because you need to flip the paper template over. Trace the template on the unsewn edges, and then trim directly on the line. This raw edge will be stitched into the shoe and hidden under the inner sole. Mark all the holes. Watch here
                8. Topstitch around the entire assembly with a ⅛” or less seam. Optionally, you can leave it unstitched and/or serge the raw edge. Watch here
                  9. Follow Steps 2-8 for each panel piece. Remember that using a right-side template to make the initial trace will result in a left-hand panel, and vice versa.
                    10. Use the included needle in the kit to pre-punch all the holes in the plastic sole.
                      Install Eyelets 
                        11. Grab a piece of scrap quilted material. Mark and then punch several 5mm holes using your punching tool of choice. You can find the tool I recommend and use in my videos here (affiliate link): Eyelet Punch Tool. Practice installing 5mm eyelets through these holes until they look the way you want them to. Once you’re satisfied with the way your eyelets are turning out, continue to the next step.
                          12. Punch 5mm holes on the indicated marked holes of your shoe panels. The remaining markings indicate where to line up your stitches to the sole, so leave them as-is until we sew the panels to the sole. Watch here
                            13. Install 5mm eyelets through the punched holes. Watch here
                              Optional Shoelace Tab
                                14. From some fabric scraps, cut out (2) 1.5” squares.

                                  15. Fold the right and left edges over ¼” and press.

                                    16. Fold the top and right edges over ¼” and press.

                                      17. Fold in half and press.

                                        18. Using the tongue template, cut through the parallel lines and mark the top of the lines on your completed tongue panel with a pencil, hera marker, or disappearing ink (don’t use permanent ink).

                                        19. Sew the top and bottom edges of the tab in place, making sure to backstitch at the beginning and end of your stitches. Trim the loose threads.

                                          Stitching the Panels Into the Sole and Finishing (all steps included in video)

                                          The first video listed is one that I made and is in real time. I bookmarked key steps (see description for bookmarks). The second one is produced by SneakerKit and has some sped up portions. I suggest watching the SneakerKit video first to get a good idea of the process.

                                          90 minute video made by me

                                          12 minute video made by SneakerKit

                                            20. Wrap the waxed thread 3.5 times around the sole of the shoe and trim.
                                              21. Carefully use a sharp implement (I used a large seam ripper) to stab each of the marked dots on your shoe panels. If you have an extra small punch this is a perfect time to use it. This will help with getting the needle threaded with the waxed thread through the panels. It can be stubborn.
                                                22. Thread the needle (I recommend using the large ball point needle that came with your kit. Make sure it can fit through all of your pre-poked holes in your panels before beginning) and pull about 6” of thread through.
                                                  23. Locate the start notch that you marked on your panel. Insert the needle through the marked dot directly above the marked notch, from the back of the panel and through the back of the marked hole on the sole.
                                                    24. Continue to stitch the panels to the sole as shown in the videos.
                                                      25. Trim the threads about  ¼” away from the sole. Use a lighter or match to “seal” the ends. The thread burns super quickly so the flame won’t damage the fabric. Just don’t hold it there too long!
                                                        26. Add reinforcement stitches between the tongue and side panels as shown in the videos.
                                                          27. Lace up your sneakers to your preference and insert the inner sole.

                                                            Congrats! Your sneakers are now ready to wear! I’d love to see a photo! Please share your finished sneakers with me by posting to Instagram (tag me @juliawachs.designs) or email me at julia@juliawachs.com.

                                                            Back to blog

                                                            5 comments

                                                            Ruth, I used 47" shoelaces for these shoes, and 42" for a prior pair.

                                                            Julia Wachs

                                                            How long are the shoelaces you used? I am making a pair soon!!

                                                            Ruth

                                                            Really interested to see how this turns out.

                                                            Jill

                                                            So excited about making these shoes!! I’m wondering if using a canvas (like something from
                                                            Art Gallery fabrics) will be too thick, I’d like them to last awhile. What do you think? Thanks for hosting this great idea.

                                                            Aimee

                                                            Hi Julia,
                                                            I would love to make some sneakers and am wondering if you know if any of the Sneaker kits are on the wide side. I wear an 8 wide.
                                                            Thank you,
                                                            Paula

                                                            Paula Simms

                                                            Leave a comment

                                                            Please note, comments need to be approved before they are published.